Sunday, May 1, 2011

Classic Roast Lemon Chicken


On quiet afternoons at work, in the last hour before closing, my coworkers and I can become rather antsy. Especially when the weather outside is gorgeous, begging you to ditch the heels and go frolic in the warm sunshine! Hours spent at our desks in the windowless office leads to bouts of restlessness, thus resulting in a small herd of designers flocking to the showroom TV set to HGTV. The best cure for this stir-craziness: "House Hunters International". We will "ooh" and "ahh" over the sandy beach-front villas, the Paris flats overlooking cobblestone streets leading to the neighborhood boucherie, and the centuries old Italian farmhouses with heaps of character in need of a little TLC.

Two of the programs this past week visited small villages in France. Places where the local cuisine features uncomplicated dishes that are all about highlighting the main food, not masking the flavor with heavy sauces and a dozen different spices. The little chef in my head instantly began yearning for something simple, rustic and perfect for the beginning of these brief bouts of clear weather in the Willamette Valley. This led to the decision to reintroduce myself with "le poulet". The tricky bit of poultry that wasn't cute when living, and especially isn't now that it's completely bare, requiring exact cooking to ensure moist, fully-cooked meat with crisp, golden skin. No matter how closely I would follow recipes, constantly poking and prodding with the thermometer, trying to see if the juices were "running clear" from the thighs, these birdies always ended up needing more cook time and were way too much of a pain.

The America's Test Kitchen TV Show cookbook has a simple recipe for roast chicken that I was willing to give a shot. This book has not let me down yet! Start with brining the chicken to encourage that extra juiciness while it cooks. The butter gives the skin that crispy, I-don't-care-how-caloric-it-is goodness. The fresh lemon wedges scent the chicken with a brightness that doesn't overpower the dish, allowing fresh spring vegetables to shine alongside. Sauteed asparagus with lemon zest along with sour cream and chive smashed potatoes were the perfect accompaniments. Leftovers are perfect additions for salads, homemade pizzas, stir-fry dishes, etc. Enjoy!


Classic Roast Lemon Chicken

1/2 cup table salt
1 (3.5 to 4-pound) whole chicken, giblets discarded
2 lemons
6 medium garlic cloves, crushed and peeled
4 tablespoons (1/2 stick) unsalted butter, 2 tablespoons melted and 2 tablespoons
chilled and cut into 2 pieces
Ground black pepper
1 3/4 cups low-sodium chicken broth
1 tablespoon minced fresh parsley leaves
1 teaspoon minced fresh thyme leaves

1. Dissolve salt in 2 quarts cold water in a large container. Submerge chicken in brine, cover, and refrigerate for 1 hour. Remove chicken, rinse well, and pat dry with paper towels.


2. Adjust an oven rack to the lower-middle position; heat oven to 375-degrees. Spray a V-rack with vegetable oil spray and set in roasting pan.

3. Cut 1 lemon lengthwise into quarters. Place lemon quarters and garlic into the chicken cavity. Brush the breast side of the chicken with 1 tablespoon melted butter and season generously with pepper. Place the chicken, breast side down, in the V-rack, then brush the back with the remaining 1 tablespoon melted butter and season generously with pepper.


4. Roast the chicken 40 minutes. Remove roasting pan from the oven; increase temp to 450-degrees. Using two large wads of paper towels, flip the chicken to breast side up; add 1 cup of chicken broth to the pan. Return the pan to the oven and continue roasting until the thickest part of the breast registers 160 to 165-degrees and the thickest part of the thigh registers 175-degrees on an instant-read thermometer, about 35 to 40 minutes longer. Remove pan from oven; tip the V-rack to let the juices from the chicken cavity run into the roasting pan. Transfer the chicken to a carving board and let rest, covered, while making the sauce. Remove the V-rack from the roasting pan.


5. Adjust the oven rack to the upper-middle position and heat the broiler. Skim the fat from the drippings in the roasting pan, add the remaining 3/4 cup chicken broth, and set the roasting pan on a burner over high heat (I transferred mine to a large saute pan). Simmer the liquid, scraping the pan bottom with a wooden spoon to loosen the browned bits, until reduced to 1/2 cup, about 4 minutes; set aside off the heat.


6. Discard the lemons and garlic from the cavity. Cut the chicken into pieces (breasts, thighs, legs, wings). Pour the accumulated chicken juices into the roasting pan, then place the chicken quarters, skin side up, into the sauce in the roasting pan; broil the chicken until the skin is crisp and deep golden brown, 3 to 5 minutes. Transfer the chicken to a serving platter.

7. Halve the remaining lemon lengthwise; squeeze the juice of one half into the roasting pan; cut the remaining half into four wedges and set aside. Whisk the remaining 2 tablespoons butter into the sauce until combined; stir in the parsley and thyme. Season with salt and pepper to taste. Serve the chicken with the pan sauce and lemon wedges. *Note: Sauce is to-die-for over the sour cream and chive smashed potatoes. It's highly recommended.

Thursday, February 24, 2011

Peanut Butter Banana Cream Pie


Stopping by Woods on a Snowy Evening
Robert Frost

Whose woods these are I think I know.

His house is in the village though;

He will not see me stopping here

To watch his woods fill up with snow.

My little horse must think it queer

To stop without a farmhouse near

Between the woods and frozen lake
The darkest evening of the year.

He gives his harness bells a shake

To ask if there is some mistake.

The only other sound's the sweep

Of easy wind and downy flake.


The woods are lovely, dark, and deep.

But I have promises to keep,

And miles to go before I sleep,

And miles to go before I sleep.


It's been two years since Eugene has seen snow. We were completely denied last year and have had a fairly warm winter so far this year (I shouldn't complain after what the east coast has been through). So when there was talk of snow coming in on my two days off I whipped out a few of my baking books and starting picking recipes to try. I can't imagine anything better than baking a delicious treat while it's snowing outside. Of course the snow didn't hit until last night after I completed my cream pie, but it's snowing right now and of course I have another recipe ready to go!

On Christmas my dad gave me the book
Baked Explorations. The two authors, Matt Lewis and Renato Poliafito, own a bakery in Brooklyn and take classic recipes that are often passed down from generation to generation and put their own creative spin on them. I adore the design of this book. The graphics and photos are styled in a sort of masculine Victorian design. Think steampunk without all of the fictional gadgets.

I decided on the recipe for Peanut Butter Banana Cream Pie. My husband is a peanut butter fiend, so this was perfect. Plan on making it earlier in the day so it has time to chill and can be served in the evening. I couldn't find chocolate-covered peanuts, so Whoppers were a delicious replacement. My hubby fell asleep on the sofa while I was finishing this up, so he hasn't tried it yet. There was no way I was going to wait until today, so I tried a slice last night: delicious! It is so worth the time it takes to prepare. The light peanut butter cream that goes on top is to die for. Try it, you'll see what I mean!


Peanut Butter Banana Cream Pie
Yield: One 9-inch Pie


For the Vanilla Wafer Crust:

6 oz. vanilla wafer cookies
6 Tbsp (3/4 stick) cold unsalted butter, cut into 1/2-inch cubes

2 Tbsp sugar


For the Banana Pudding Filling:

1/3 cup sugar
1 1/2 Tbsp cornstarch

1/8 tsp salt

1 cup heavy cream

1/2 cup whole milk

2 large egg yolks

1 vanilla bean (I used 1 tsp extract)

1 Tbsp unsalted butter

3 ripe bananas, peeled

2 Tbsp orange juice

For the Peanut Butter Topping:
3 oz. cream cheese, softened
1/2 cup confectioners' sugar

1 tsp pure vanilla extract
1/3 cup creamy peanut butter (not old-fashioned or freshly ground)

2/3 cup heavy cream, chilled


Assembly:

1 ripe banana, peeled (optional)

1 Tbsp orange juice (optional)

Chocolate covered peanuts/ Whopper candies (optional)

Preheat oven to 350-degrees with the rack in the middle.

Make the crust:

Place the vanilla wafer cookies, butter, and sugar in a food processor. Pulse in short bursts until the mixture resembles a moist crumb. Turn the mixture out into your pie plate and press it into the bottom and up the sides. Using the back of a large spoon will help make it even.


Bake the crust until it is golden brown, 10-12 min. If it begins to puff while baking, use the back of the spoon to press it gently down. Allow it to completely cool.


Make the banana pudding filling:
In a medium saucepan, whisk together the sugar, cornstarch, and salt. Slowly, while whisking continuously, stream in the cream, then the milk. Add the egg yolks. Cut the vanilla bean in half lengthwise and, using the tip of the knife or a small teaspoon, scrape the seeds into the saucepan (or add 1 tsp vanilla extract). Whisk until the mixture is combined. Discard the bean.


Turn the heat to medium-high and, whisking occasionally, bring the mixture to a boil, about 5 minutes. Remove the pan from the heat, add the butter, and stir vigorously for about 2 minutes to release excess heat. Spread the warm pudding over the cooled crust and chill the pie until the filling is completely cool, about 1 hour.


After the filling has chilled, thinly slice the bananas on a diagonal. Toss the slices in the orange juice. Transfer the banana slices to a paper towel and pat them dry. Arrange them in a single layer over the pudding to cover it completely. Return the pie to the refrigerator while making the peanut butter topping.


Make the peanut butter topping:
In the bowl of a standing mixer fitted with the paddle attachment, beat the cream cheese and confectioners' sugar until smooth. Add the vanilla and peanut butter, and beat until just combined.


In a clean bowl of a standing mixer (I transferred the peanut butter mix to a bowl and cleaned this one to use again), use the mixer fitted with the whisk attachment and whip the cream until soft peaks form. Remove the bowl from the mixer and, with a rubber spatula, gently fold the whipped cream into the peanut butter mixture until the topping is uniform in color. Spread the peanut butter layer evenly over the bananas on the pie. Chill for at least 3 hours or as long as 8 hours.


To assemble: Optional: Just before serving, thinly slice the banana on a diagonal and toss it with the orange juice. Arrange the banana slices around the top edge of the pie, then arrange chocolate-covered peanuts (or Whoppers) around the edges of the banana slices, if desired. Serve immediately.


The pie tastes best if eaten within 24 hours. On the rare occasion that you have leftovers, wrap the pie in plastic wrap and refrigerate it for up to 3 days.

Monday, February 14, 2011

Sausage Mushroom Breakfast Strata

A few months back my dad gave me a copy of The America's Test Kitchen TV Show Cookbook with every recipe they covered on their show from 2001-2010. I receive their Cook's Country magazine and know that when it comes to testing recipes, this crew doesn't mess around! If a tricky recipe takes weeks to perfect, so be it! The testers for the magazine discuss the process of how they work on each recipe until they have the desired end result. In the ATK cookbook, each recipe begins with an excerpt on "Why This Recipe Works". The team explains how each particular recipe is THE one you want to make. After cooking around 20 different recipes from this book, I'm a believer. Going into each recipe, I know it's been thoroughly tested and will have great results.

While flipping through the back pages I hit the "Come for Brunch" section and immediately halted when I saw the photo of their breakfast strata. Baked slices of bread coated with spinach, egg and cheesy goodness? Yes please! I began with the basic recipe that uses layers of toasted bread, spinach and Gruyere. I assembled the dish the night before, allowing the egg-milk mixture to be fully absorbed by the bread. Then the next morning all I had to do was pop it into the pre-heated oven. Easier than pouring a bowl of cereal! Let me tell you, this dish was phenomenal. The layers all bake together into the perfect breakfast dish and gets your day off to a great start!
When I was in Portland last week my parents and I decided that this would make a great "Breakfast for Dinner". The ATK book has a variation of the basic recipe that includes breakfast sausage and mushrooms instead of spinach and Monterey Jack in place of the Gruyere. We added some spinach into the sausage-mushroom mix anyways. The result was perfect! The sausage gives the dish a warm hint of flavor that blends perfectly with the cheese and mushrooms. This is the ideal recipe to make when you know you'll have morning guests. Bring on the brunch!


Breakfast Strata with Sausage, Mushrooms, and Monterey Jack
The Complete America's Test Kitchen TV Show Cookbook

*To double the recipe, use a 13 by 9-inch baking dish and increase the baking time to 1 hour and 20 minutes.


8-10 (1/2-inch-thick) slices supermarket French or Italian bread
3 Tablespoons unsalted butter, softened
8 oz. bulk breakfast sausage, crumbled
3 medium shallots, minced (6 Tbsp)
8 oz. white mushrooms, wiped clean and quartered (I sliced)
Handful of fresh spinach leaves (or box of frozen spinach, thawed and moisture squeezed out), chopped
Table salt and ground black pepper
1/2 Cup dry white wine
6 oz. Monterey Jack cheese, shredded (1 1/2 Cups)
6 large eggs
1 3/4 Cups half-and-half
2 Tablespoons minced fresh parsley leaves

1. Heat the oven to 225-degrees and place the rack in the center position. Arrange the bread in a single layer on a baking sheet and bake until dry and crisp, about 40 minutes, turning slices over halfway through (Alternatively, leave slices out overnight to dry). Spread butter evenly over one side of each bread slice, using 2 tablespoons of the butter.

2. Fry the sausage in a medium nonstick skillet over medium heat, breaking the sausage apart with a wooden spoon, until it loses its raw color and begins to brown, about 4 minutes; add the shallots and cook, stirring frequently, until softened, about 3 minutes. Add mushrooms to the skillet and cook until they no longer release liquid, about 4 minutes (if using spinach, add during last minute of cooking); transfer to a medium bowl and season with salt and pepper to taste. Add the wine to the skillet, increase the heat to medium-high, and simmer until reduced to 1/4 cup, 2 to 3 minutes; set aside.


3. Butter an 8-inch square baking dish with the remaining butter; arrange half of the bread slices, buttered-side up, in a single layer in the dish. Sprinkle half of the sausage-mushroom mixture, then 1/2 cup of the shredded Monterey Jack, evenly over the bread slices. Arrange the remaining bread slices in a single layer over the cheese; sprinkle the remaining sausage-mushroom mixture and a 1/2 cup more Monterey Jack evenly over the bread. Whisk the eggs in a medium bowl until combined; whisk in the reduced wine, half-and-half, 1 teaspoon salt, the fresh parsley, and a pinch of pepper. Pour the egg mixture evenly over the bread layers.


4. Wrap the strata tightly with plastic wrap, pressing the wrap against the surface of the strata. Weigh the strata down (I used heavy containers of leftovers that were already in the fridge), and refrigerate for at least 1 hour or up to 24 hours.


5. Remove the dish from the refrigerator and let stand at room temp for 20 minutes. Meanwhile, adjust an over rack to the middle position and heat the oven to 325 degrees. Uncover the strata and sprinkle the remaining 1/2 cup Monterey Jack evenly over the surface; bake until both edges and center are puffed and the edges have pulled away slightly from the sides of the dish, 50 to 55 minutes. Cool on a wire rack for 5 minutes and serve.


Saturday, November 27, 2010

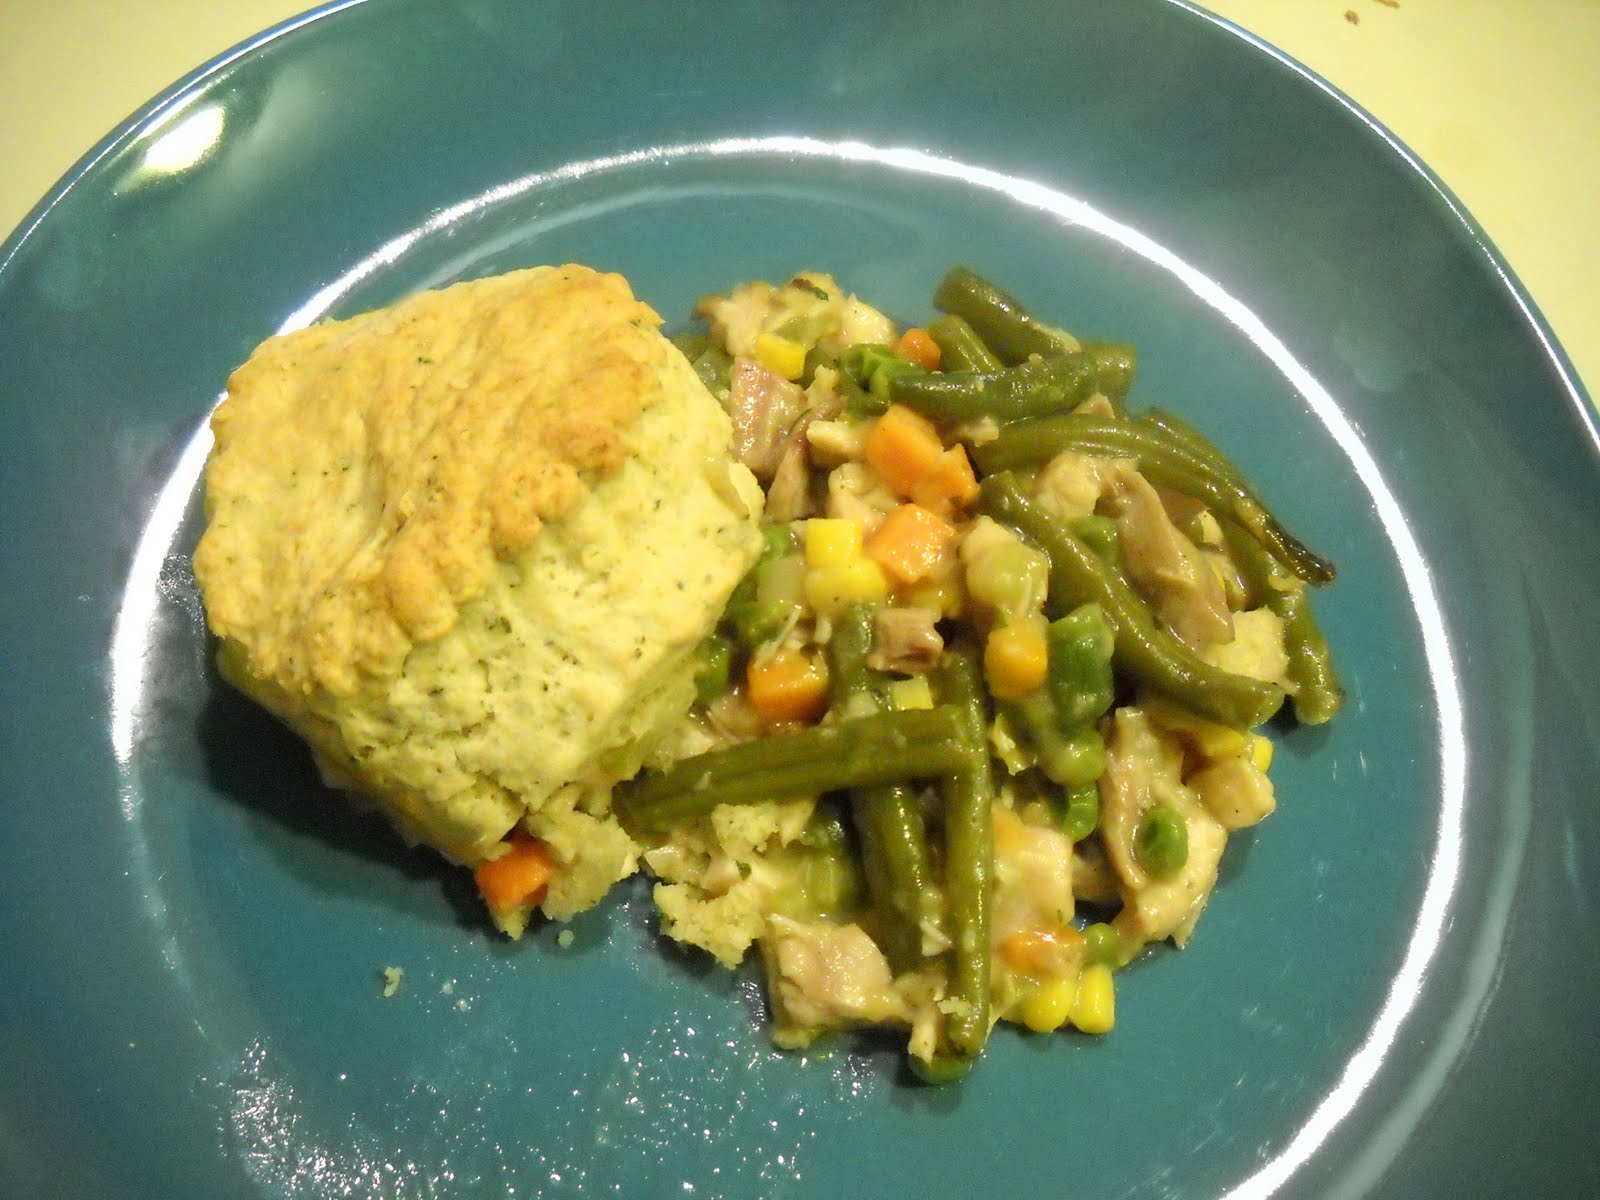
Quick Fix for Thanksgiving Leftovers


This year my family cooked a 20 lb. turkey for Thanksgiving. In previous years we would purchase a smaller bird and end up with leftover meat for only one extra meal. This year we decided to get a larger bird, thus ensuring more leftovers! This turkey was a beauty! But I'm not going to lie, my arms are a bit sore from lifting it out of the oven every half hour for basting. My husband and I split the leftover meat with my family and came home with a hefty Tupperware container full of juicy, flavorful turkey. Sweet!

I found this recipe for Turkey Pot Pie and it was an instant must-have. I had all of the ingredients on hand, saving me an excursion into the evening crowds at the grocery store. I didn't have buttermilk on hand, but a friend gave me a kitchen tip: add a splash of vinegar to a cup of milk and let it stand for a bit. The milk will sour, thus ending becoming buttermilk. This meal was quick to fix and turned out so much better than I had anticipated! The biscuits were incredibly moist and buttery and paired perfectly with the creamy veggies and turkey. If you don't have turkey on hand, a few cooked chicken breasts do the job.


Turkey Pot Pie
Recipe from Ziploc.com


Serves: 4

Filling Ingredients:
3 Tablespoons butter
3 Tablespoons flour
1/2 medium onion, chopped
1 celery stock, sliced
1 1/2 cups chicken broth
1 1/2 cups leftover mixed vegetables
2 cups cooked turkey, cubed
1 teaspoon fresh thyme
Salt and pepper to taste

Biscuit Ingredients:
2 cups flour
1 Tablespoon baking powder
1/2 teaspoon baking soda
3/4 teaspoon salt
6 Tablespoons cold unsalted butter, cut into small pieces
1/2-2/3 cup buttermilk
2 Tablespoons fresh sage, chopped

Preparation:
Preheat oven to 400 degrees.
For filling: Melt butter in a small saucepan over low heat. Add onion and celery and cook about 5 minutes, until tender. Stir in flour. Slowly add chicken broth. Increase heat to medium and stir until thickened, about 5 minutes. Reduce heat and add turkey and mixed vegetables. Stir in thyme and season to taste with salt and pepper.


Pour into a 2 qt. casserole dish (a 1.5 qt. worked for me).


For biscuit topping: In a food processor combine flour, baking soda, baking powder and salt. Add butter and pulse until coarse crumbs form. Add sage and pulse a couple more times.


Gradually add buttermilk through the feed tube and process until the dough just sticks together.


Turn dough out onto a floured board and knead a few times. Pat dough into a circle about 3/4-inch thick. Cut dough into 4 or 5 circles with a circle cutter or glass. Place circles on top of filling in casserole.


Bake pot pie at 400-degrees for 20-25 minutes or until golden brown.


Friday, November 19, 2010

Pumpkin-Orange Muffins


On a typical fall day in the Pacific Northwest, nothing sounds more appealing than being inside, curled up on the sofa with a good book. I was visiting my parents in Portland for a few days and stopped at Powell's the first morning, thus ensuring I was well stocked with reading material. With my new book in hand, the cat comatose in front of the fireplace and the heavy raindrops cascading down the side of the house; it was the setting I always yearn for when the weather turns nasty. These wet fall days call for homemade baked goods. Pumpkin-Orange Muffins are a cinch to whip up and call for ingredients you will likely have on hand this time of the year. They are incredibly moist and are the perfect afternoon snack on a rainy day.


Pumpkin-Orange Muffins
From the American Institute for Cancer Research
Makes 9
Canola oil spray
1 egg
1/2 cup skim milk
1/2 cup canned pumpkin
1/4 cup canola oil
1 tsp. grated orange zest
1.5 cups unbleached flour
1/2 cup sugar
1 tsp. baking powder
1 tsp. cinnamon
3/4 tsp. nutmeg
1/4 tsp. salt

1. Preheat oven to 375-degrees. Spray muffin tin lightly with oil.

2. In a medium bowl, beat egg, milk, pumpkin, oil, and grated orange zest, mixing well.

3. In a separate bowl, combine the dry ingredients. Mix dry ingredients into pumpkin mixture.


4. Spoon batter into a greased muffin tin, filling each cup 1/2 to 2/3 full. Bake until a toothpick inserted in the middle of a muffin comes out clean, about 20 to 25 minutes.


5. Remove from oven and set on a wire rack to cool, about 5 to 10 minutes. Remove muffins and allow to cool completely on rack. Serve immediately or store in a plastic bag or other sealed container but do not refrigerate (If making more than one batch, extras can be frozen.)