
This is part two of the care package for my sister. These cookies sound like they would be more complicated, but actually, the chocolate chip cookies required more concentration (and it was worth it!). They're super quick to whip together. The applesauce keeps the cookies nice and moist. Yum!
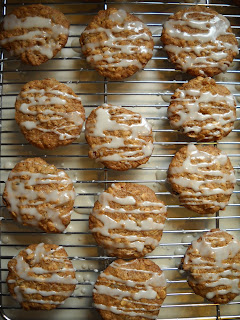
Iced Oatmeal Applesauce Cookies
From Martha Stewart's Cookies book
Makes about 2 1/2 dozen
For the Cookies:
4 Tbsp unsalted butter, melted
1 cup packed light brown sugar
1/2 cup granulated sugar
1 large egg
1/2 cup chunky-style applesauce
1 1/2 cups old-fashioned rolled oats
1 1/4 cups all-purpose flour
1/2 tsp baking soda
1/4 tsp baking powder
1/4 tsp coarse salt
1 cup golden raisins
For the Icing:
1 3/4 cups confectioners' sugar
3 Tbsp pure maple syrup
3 Tbsp water
1. Preheat oven to 350-degrees. Make cookies: Put butter and sugars in the bowl of an electric mixer fitted with the paddle attachment. Mix on low speed until combined. Add egg and applesauce, mix until well blended, 2 to 3 minutes.

2. Mix in oats, flour, baking soda baking powder, and salt. Mix in raisins.

3. Using a 1 1/2-inch ice cream scoop, drop dough onto baking sheets lined with parchment paper, spacing 2-inches apart.

4. Bake cookies until golden and just set, 13 to 15 minutes, rotating halfway through. Let cool on sheets 5 minutes. Transfer cookies to a wire rack set over parchment paper; let cool completely.

5. Make icing: Whisk confectioners' sugar, maple syrup, and water until smooth. Drizzle over cookies; let set.

Cookies can be stored in single layers in airtight containers at room temperature up to 3 days. Enjoy!


I was talking to my sister the other night and she was explaining all the different papers she has to write and the french exam she has to prep for by next week. Ah yes... finals. Thank goodness those days are over! But I'm still a big sister and when my sister is stressed, I get that old feeling of school stress too. I decided she needed a little care package; something that MUST contain sugary goodness and love. I picked up some cute post-it notes at Borders that have little cartoon foods on them... I couldn't say no to those! I also grabbed a fun pen with little owl graphics on it. I purchased a bag of Easter chocolates at the grocery store (no care package is complete without chocolate!)
Now on to the cookies. I wanted to make something she'd like (pretty much any cookie) and have it be a fun recipe for me to tackle. The first cookies I decided on are the "Perfect Chocolate Chip Cookies". Yet another recipe from our friends at America's Test Kitchen. The second was a recipe out of my Martha Steward Cookies book, but I'll get to those another time. Let's focus on one of the happiest things in the world: Chocolate (Julia Child would probably say butter... and that comes in at a close second here).
Like all of their recipes, the team at America's Test Kitchen go through every step of making these cookies, ensuring that they get the best results possible. I had viewed the episode where they bake these chocolate chip cookies and was intrigued. The thing I found most interesting was that they melted and browned the butter before using it. Why?! Well, I found out. You take all, but 4 Tbsps of the butter and let it melt in a saucepan, constantly swirling. Then it slowly starts to brown. The recipe says to wait until it's dark brown and has a "nutty aroma". Nutty? Ok, I kept swirling and smelling.... and then it happened. No joke, it smelled nutty! Like almond roca! Like you want to eat a spoonful of pure butter! You then transfer it to a bowl and stir in the remaining butter until melted. It will get super bubbly and foam up, then mellow out as it finishes melting.

Now on to the chocolate. I've always used Nestle's chocolate for baking. It's the most affordable and I know it works. Not now. My mom had made chocolate chocolate-chip cookies a few weeks back using Ghiradelli chocolate morsels... and they were delicious! The chocolate took the cookies up a whole extra notch. The grocery store had a special, so I bought two bags of the Ghiradelli semisweet morsels. This was a fabulous decision because during my first attempt of this recipe I completely overlooked the sentence where I add the eggs. How? No idea. I'm sure we've all done it once or twice. I got to the point where I was trying to roll out the balls of dough and they wouldn't stick together! Oh well, the second time around everything went much more smoothly.
How did my cookies turn out? Perfect!! They were melt in your mouth chocolate chip cookies! The edges have a great crunch, yet the centers are super chewy. I was lucky enough to try one when the chocolate was still slightly warm.... Ooooh yummy! The cookies had a nice depth of flavor due to browning the butter. I'm sticking with this recipe for good. You can also find it on their site at America's Test Kitchen.

Perfect Chocolate Chip Cookies
Makes 16 cookies (they're pretty big)
1 3/4 cups unbleached all-purpose flour
1/2 tsp baking soda
14 Tbsp unsalted butter
1/2 cup granulated sugar
3/4 cups packed dark brown sugar
1 tsp table salt
2 tsp vanilla extract
1 large egg
1 large egg yolk
1 1/4 cups semisweet chocolate chips or chunks
3/4 cup chopped pecan or walnuts (optional)
1. Adjust oven rack to middle position and heat oven to 375 degrees. Line 2 large (18- by 12-inch) baking sheets with parchment paper. Whisk flour and baking soda together in medium bowl; set aside.
2. Heat 10 Tbsp butter in a 10-inch skillet over medium-high heat until melted, about 2 minutes. Continue cooking, swirling pan constantly until butter is dark golden brown and has nutty aroma, 1 to 3 minutes. Remove skillet from heat and, using heatproof spatula, transfer browned butter to large heatproof bowl.

3. Stir remaining 4 Tbsp butter into hot butter until completely melted.

4. Add both sugars, salt, and vanilla to bowl with butter and whisk until fully incorporated.

5. Add egg and yolk and whisk until mixture is smooth with no sugar lumps remaining, about 30 seconds. Let mixture stand 3 minutes, then whisk for 30 seconds. Repeat process of resting and whisking 2 more times until mixture is thick, smooth, and shiny.

6. Using rubber spatula or wooden spoon, stir in flour mixture until just combined, about 1 minute (The mixture should start off feeling super silky- shown below, then thicken as you add more flour).

7. Stir in chocolate chips and nuts (if using), giving dough final stir to ensure no flour pockets remain.

8. Divide dough into 16 portions, each about 3 Tbsp (or use #24 cookie scoop). Arrange 2 inches apart on prepared baking sheets, 8 dough balls per sheet. Smaller baking sheets can be used, but will require 3 batches (which I did because of my teeny-tiny oven).

9. Bake cookies 1 tray at a time until cookies are golden brown and still puffy, and edges have begun to set, but centers are still soft, 10 to 14 minutes, rotating baking sheet halfway through baking (I baked 5 minutes, rotated the sheet, then baked 6 minutes more). Transfer baking sheet to wire rack; cool cookies completely before serving. Enjoy!

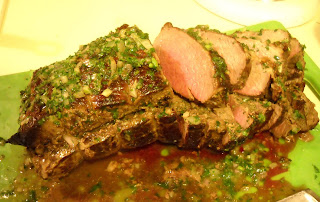
Before I head to the grocery store, I plan out what meals I'm going to make. I make a list of what sounds good and which ingredients I'll need to buy. I can usually rule out any that are going to need a ton of ingredients. More ingredients = more money. Not good when I'm trying to save for the wedding (Gah! Only 5 more months!). My last post was a recipe from Cooks Country. I seriously love this magazine!! I browsed through my first issue (January) and came across the recipe for "Affordable Herbed Roast Beef". I'm quite sure this is the best title to attract that person who loves to cook, but can't spend much money on groceries (ME). A quick glance at the ingredients and I'm quickly scribbling it down on my list of recipes to make.
The meat department didn't have any top sirloin roasts, but did have a top round roast on sale. The butcher suggested I try that instead (and it was on sale... score!). The only beef roast I've ever prepared was in the crock pot, so this was really fun. I made the herb spreads, butterflied the meat and spread the herb-mustard mixture on the inner meat. (The recipe tester wrote about his decision to use mustard to hold the herbs together inside the meat. I guess the butter would melt and run all over. He uses the butter mix on the outside after cooking) I tied it up nice and tight, and set the big guy in the fridge while I went to work. When I got home I was able to quickly brown the meat (again, the key is drying it first!) and pop it in the oven to start cooking. I roasted it for around an hour and 40 minutes and it had the perfect amount of pink and was so tender! I served it with garlic mashed potatoes, buttered peas, and a loaf of sourdough that you finish baking yourself. Our friend Aaron came over for dinner, so we enjoyed good company, good food, and the Academy Awards! Dale and I had print-offs of the different nominations and had each voted on who we thought was going to win. It came down to the best picture... and he beat me. Hurt Locker did deserve the win.

Herbed Roast Beef
Serves: 6 to 8
*For even deeper seasoning, refrigerate the roast overnight after filling it with the herb mixture in step 2
1/3 cup finely chopped fresh Italian parsley
2 Tbsp. minced fresh thyme
1 shallot, minced
1 Tbsp. Dijon mustard
2 Tbsp. olive oil
4 Tbsp. unsalted butter *softened*
1 (4-lb.) top sirloin roast, fat trimmed to 1/4-inch thick (I used top round roast)
1 Tbsp. salt
1 Tbsp. pepper
1. Prep Herbs: Combine parsley, thyme, and shallot in bowl. Transfer 2 tablespoons herb mixture to another bowl and stir in the mustard and 1 tablespoon oil until combined. Add butter to remaining herb mixture and mash with fork until combined.
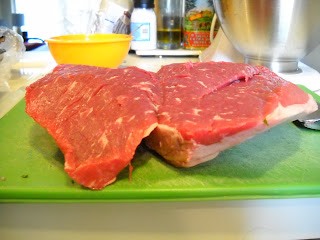

2. Prep Beef: Butterfly the roast; slice horizontally through the middle of the meat (along a long side), leaving about 1/2-inch intact. Open like a book. Rub inside and out with salt and pepper. Spread herb-mustard mixture over interior of meat and tie securely with kitchen twine at 1-inch intervals. Refrigerate at least 1 hour or up to 24 hours.


3. Brown and Roast: Adjust oven rack to middle position and heat oven to 275-degrees. Pat roast dry with paper towels. Heat remaining oil in large skillet over medium-high heat until just smoking. Brown roast all over, 8 to 12 minutes, then arrange on V-rack set inside roasting pan. Transfer to oven and roast until meat registers 125-degrees (for medium-rare), 1.5 to 2 hours (I did an hour and 40 minutes, for a little less pink than med-rare).

4. Butter and Rest: Transfer roast to carving board, spread with herb-butter mixture, tent with foil, and let rest 20 minutes. Remove kitchen twine. Slice roast crosswise against grain into 1/4-inch slices. Serve.

 I was up in Portland last week to see my parents and meet with me and Dale's wedding photographer. My mom had eye surgery that Monday and was taking it easy, so I decided to handle dinner. My dad got each of us subscriptions to the Cooks Illustrated and Cooks Country magazines for Christmas. These magazines are done by America's Test Kitchen and are so informative! Their cooking teams take all the time they need to perfect recipes. They talk about the process and the different obstacles they face. They also test and rate different cooking utensils and tools. It's really fun to read! Plus, you know that the recipes actually work. They cover all sorts of short-cuts and tips for cooking.
I was browsing through the latest issue of Cooks Country and came across Skillet-Glazed Pork Chops. The photo instantly triggers your drool glands. Quickly skimming the recipe I see that the only thing we need from the store is the pork! Everything else you should have on hand. We went to New Seasons and picked up the pork chops from the meat counter. Now, I usually buy the chops that are prepackaged and are only around 1/2-inch thick. Not this time. These chops were so thick! Probably slightly over an inch with a nice layer of fat along one edge. The recipe calls for you to make two slices along the side of each strip of fat. This keeps the pork flat while it cooks, instead of curling when the fat is left whole.
It took me a little longer to cook the pork than the recipe calls for. I always check the meat with a thermometer to be safe. The chops were the perfect size serving! We had salad and mashed potatoes with peas as sides. I can't wait to make this again!
Skillet-Glazed Pork Chops
Servings: 4
Time: 25-30 minutes
Ingredients
4 boneless center-cut or loin chops, 3/4 to 1 inch thick
Salt and pepper
1/2 cup maple syrup
2 tsp. Dijon mustard
1/4 cup cider vinegar
1 tsp. minced fresh thyme
1 Tbsp. vegetable oil
1. Prep Chops: Trim chops and slash through fat and silver skin, making 2 cuts about 2 inches apart on sides of each chop. Pat chops dry with paper towels (the key to properly browning, as I learned from Julia Child!) and season with salt and pepper. Combine maple syrup, mustard, vinegar, and thyme in bowl.

2. Cook Chops: Heat oil in large skillet over medium-high heat until just smoking. Add pork to skillet and cook until well browned, about 5 minutes. Turn chops and add glaze mixture. Turn heat down to medium-low and cook until internal temperature registers 140 degrees, 5 to 8 minutes. Remove chops to plate and tent with foil.
 3. Reduce Glaze: Return any accumulated juices to skillet and simmer glaze over medium heat until thick and syrupy. Pour reduced glaze over chops. Enjoy!


I have been horrible about writing on here! Mostly because I'm trying to do fewer personal tasks on the computers at work and by the time I get home I'm too tired. Excuses, excuses. I've really cut back on cooking lately and am frequently using the crock pot. It saves me an hour to an hour and a half each night prepping and cooking dinner. Then I can go to bed earlier and get up early to go to the gym! But I've missed cooking quite a bit. Even when I'm tired after a long day at work I am so content when I'm chopping veggies, stirring something on the stove, or especially taste-testing a dish!
Last week when I was up in Portland visiting my parents, my dad and I were trying to figure out where to go for lunch. I suggested the Horse Brass Pub, although I actually meant the Knob Hill Pub. I had never been to the Horse Brass Pub, but had heard my dad mention it every once in a while. He hadn't been there since the '70's and thought that it was a great idea, so we ventured over to the east side of Portland to try it out. The place still gets great reviews and we found out why! The moment we walked in, my dad exclaimed, "Welcome to England!" And he wasn't joking. Total British pub atmosphere! The low lighting, wood beams, long bar, photos and posters of different beers companies and bands that looked like antiques, but might have just been on the wall for 30-40 years. Dart boards lined one of the back walls and my dad informed me that they still have big dart competitions there. The owner was actually sitting at the bar. My dad hadn't seen the guy in 30 years and said he looks pretty much the same, except his long brown hair and beard are now grey. We each got an Ice Pick Ale, which was a somewhat lighter IPA: perfect for lunch! The menu was pure British food: pot pies, bangers 'n mash, fish 'n chips, and some other dishes I didn't recognize. We stuck with the pot pies; My dad got a beef and mushroom pie and I got the chicken. DELICIOUS. They were probably about 5" in diameter and were super filling. You could tell this was the real deal. It was such a great atmosphere and I can't wait to go back again!
The March issue of Food Network Magazine had a recipe for Cheese-Potato Slab Pie. Upon glancing at the photo of the pie, you immediately feel the drool kicking in. After last week's chicken pot pie, I was so ready to tackle this. Definitely a weekend meal though. The prep goes quite quickly; the dough is mixed in the food processor earlier in the day and I used my mandolin slicer for the veggies and apples. The time factor comes in when you go to assemble the pie. You put everything together, then refrigerate it for 30 minutes, bake it for an hour, then let it sit for another half hour. This is really worth it though. I only had an 8" round pie dish, which wasn't quite wide enough or deep enough, but I made due. The recipe calls for an 8" square dish.
Cheese-Potato Slab Pie
Active cook time: 1 hour Total: 2 hrs 30 min (plus chilling)
Serves: 8
For the Crust:
3 1/2 cups all-purpose flour, plus more for dusting
1 Tbsp sugar 1 tsp fine salt
3 sticks unsalted butter, cubed (keep cold in freezer)
1 Tbsp white or apple cider vinegar (I liked the apple)
For the Filling:
4 Tbsp extra-virgin olive oil
1 large onion, thinly sliced
Kosher salt
4 large red-skinned potatoes (1.5 lbs), unpeeled
2 gala apples, unpeeled
2 sprigs fresh thyme, leaves stripped
Freshly ground black pepper
3 Tbsp breadcrumbs (eyeball it)
5 oz. mortadella or ham, thinly sliced
10 oz. white cheddar cheese, shredded
Heavy cream for brushing (I used melted butter)
1. Make the crust: Pulse the flour, sugar and salt in a food processor. Add 1 stick butter and pulse until combined. Add the remaining 2 sticks butter and pulse three times, or until the mixture resembles coarse meal. Add the vinegar, then gradually add 1/3 cup ice water through the feed tube, pulsing four times, until evenly combined. Squeeze the dough between your fingers. If it doesn't hold its shape, add up to 2 Tbsp ice water and pulse two more times (the dough should still be crumbly). Turn out onto a clean surface and press into a ball; divide in half, wrap in plastic wrap and flatten into two 1-inch-thick rectangles. Refrigerate at least 1 hour or up to 2 days.  2. Make the filling: Heat 2 Tbsp olive oil in a skillet over medium heat. Add the onion and cook until slightly brown, 5-7 minutes; season with salt and let cool. Slice the potatoes and apples very thinly; toss in a bowl with the thyme, the remaining 2 Tbsp olive oil, and salt and pepper to taste.
  3. Line an 8-inch square baking dish with foil, leaving a 1-inch overhang on all sides. On a floured surface, roll out one piece of dough into a 12-inch square, about 1/8-inch thick. Transfer to prepared dish, tucking the dough into the edges and corners; don't trim the overhang. Sprinkle the breadcrumbs over the dough and add the onion. Lay the mortadella/ham on top, then sprinkle with about one-third of the cheese. Layer half of the potatoes and apples on top in a single layer, then sprinkle with another one-third of the cheese. Top with the remaining potatoes, apples and cheese.
  4. Roll the remaining dough into a 12-inch square and place on top of the filling. Press the overhang of the two crusts together, then roll the dough under itself and pinch to make a 3/4-inch-high edge. Make slits in the top crust with a knife to allow steam to escape. Refrigerate 30 minutes. Meanwhile, preheat oven to 425-degrees.
  5. Bake pie until golden brown, about 30 minutes. Reduce the temperature to 400, brush with cream and continue baking until crisp, about 35 more minutes. Cool 25 minutes, then lift out of the pan and slice.


