Tuesday, March 30, 2010
A New Twist on Chicken Cordon Bleu
You may remember last fall when I posted a short note on a dinner we had at my fiancé's mothers house. His step-dad made Chicken Cordon Bleu and it was amazing! The chicken was fully cooked and intensely moist. The ham and Parmesan cheese that were rolled with the chicken added a great combination of flavor. I was thinking to myself that I need to try this recipe! At that moment, Dale looked up at me and said, "You have to make this!" Well, that was settled.
The not so easy part was actually getting around to purchasing the ingredients. Chicken breasts are rather expensive. When I buy other meats, we generally get leftovers for a couple more nights. Chicken is usually consumed in the first night because there isn't as much of it. A few weeks ago I ran across a new take on Chicken Cordon Bleu in my May issue of Cook's Country. Instead of pounding the daylights out of the chicken breast, then rolling it with the ham and cheese, the recipe has you cut a slit into the side of the breast and add a roll of ham with cheese in the middle. I instantly loved this idea. See, I've done rolled chicken breast before and it took lightyears for the center parts of the chicken-roll to cook! At that point the outer-parts were dry. This approach makes loads of sense! And although it's fun to pound the chicken into a pancake, cutting a slit in the side is much easier.
I made this recipe twice last week; once for my parents, then again for Dale's dad and his girlfriend. Obviously I liked it the first time, so I made it again. Whereas the first time took me ages, the second time went more quickly. As it goes with most recipes, the more you make something, the faster it is to prepare; you know what needs to be pulled out and prepped ahead of cooking to save time. Both times the chicken turned out perfect! And you'll never guess my favorite part: the bread-crumbs! The bread-crumb mix was a combination of Ritz crackers, white bread and melted butter. You pulse them in a food processor then toast in the oven. They add a nice crunch to the chicken and have a warm, buttery flavor: yum!
When you cut into the chicken to make the pocket for the ham, be sure to go slowly and try to be aware of where your knife is in the breast. The first time I cut all the way through and some cheese escaped while baking. We can't let the cheese escape!! This recipe calls for Swiss cheese. I think next time I may try Gruyere. The Swiss had a little more kick than I cared for. This is easy to prepare ahead of time; breaded chicken can hang out in the fridge for up to a day (this saved me loads of time after a busy afternoon).
Foolproof Chicken Cordon Bleu
Kris Widican, Cook's Country May 2010
25 Ritz crackers
4 slices hearty white sandwich bread, torn into pieces
6 Tbsp unsalted butter, melted
8 thin slices deli ham (about 8 oz)
2 cups shredded Swiss cheese
4 boneless, skinless chicken breasts (about 2 pounds total)
Salt and pepper
3 large eggs
2 Tbsp Dijon mustard
1 cup all-purpose flour
1. Adjust oven racks to lowest and middle positions and heat oven to 450-degrees. Pulse crackers and bread in food processor until coarsely ground. Drizzle in butter; pulse to incorporate.
2. Bake crumbs on rimmed baking sheet on middle rack, stirring occasionally, until light brown, 3 to 5 minutes. Transfer to shallow dish. Leave oven on.
3. Top each ham slice with 1/4 cup cheese and roll tightly (into a log); set aside (The second time around, I used less cheese and was able to get tighter rolls than shown here, thus allowing the larger chicken breasts to have enough room for two rolls).
4. Pat chicken dry with paper towels. Cut pocket in thickest part of chicken and stuff each breast with 2 ham-and-cheese rolls (note: smaller breasts may only hold one roll). Season both sides with salt and pepper. Transfer chicken to plate, cover with plastic wrap, and refrigerate at least 20 minutes.
5. Beat eggs and mustard in second shallow dish. Place flour in third shallow dish. One at a time, coat stuffed chicken lightly with flour, dip into egg mixture, and dredge in crumbs, pressing to adhere (breaded chicken can be refrigerated, covered, for 1 day).
6. Transfer chicken to a baking sheet. Bake on lowest rack until bottom of chicken is golden brown, about 10 minutes, and then move baking sheet to middle rack and reduce the oven temperature to 400-degrees.
7. Bake until golden brown and chicken registers 160-degrees, 20-25 minutes. Transfer to cutting board, tent with foil, and let rest 5 minutes. Serve.
Thursday, March 25, 2010
A Cake Tasting
Yesterday I stopped by the Edgefield to decide on the type of cake for the wedding. Of course I was accompanied by my two dessert fanatics: my father and my sister. These are two people who have never said "no" to a bite of dessert. The Edgefield event coordinator we're working with brought out a platter with two (fairly large) cupcakes and a piece of chocolate cake. The options I had narrowed down to were: Chocolate cake with chocolate mousse filling with raspberry, White cake with white chocolate cream cheese filling with raspberry, and White cake with vanilla bean custard. YUM! All three were incredibly delicious.
I remembered to snap a photo before we finished devouring the samples. Can you guess which one we decided on?
Saturday, March 20, 2010
Super Easy Irish Soda Bread
Last week when I invited my friends over for dinner on St. Patrick's Day I had no clue what to make. I know English food... but not Irish food. Obviously meat will be involved, but what kind? My mom quickly filled me in on two popular dishes: Corned beef and Irish soda bread. Oh. Um, what are those? I opened my meat cookbook and found a recipe for corned beef... that takes up to five days of brining. I only had two days until St. Patrick’s Day! As I started browsing corned beef recipes online, I found that most grocery stores carry packaged corned beef that's ready to be cooked: perfect!
Now about the soda bread. My mom emailed me a copy of her recipe from Ina Garten. I read through it (Surprisingly there was a lack of "soda" in the ingredients) and was satisfied that it looked fairly easy. I was pretty sure some sort of challenge would come up, but I obtained all the necessary ingredients to try this bread recipe. I really only needed buttermilk, an orange and dried currants.
I found a recipe for the corned beef that calls for it to cook in a crock pot. I love this idea because it frees up the oven to bake other things: cupcakes, soda bread! While the corned beef was happily simmering away atop a bed of chopped veggies, I began the soda bread. I’ve made beer cheese bread once. It turned out a little dry and dense. I had no idea what to expect with this soda bread! Mixing the ingredients was a breeze. I made sure not to mix the dough too much (that’s one thing I’ve learned since the beer bread)… I only kneaded it a few times on my wood board… shaped it into a round loaf… sliced an “X” into the top… and voila! Wait, that was easy. I was so worried I would do something wrong! With baking, it’s much more difficult to fix mistakes, but this went so smoothly!
Ina suggests tapping the loaf and listening for a hallow sound to see if it is fully baked. I ended up cooking it for the full 55 minutes and it sounded about the same as it did at 45 minutes. Next time I may take it out after 45 minutes to see if it changes the texture of the bread. This works great with dinner. It was soft inside and the little currents and orange zest add just the right amount of sweetness. I wasn’t sure if it would be too much like a dessert bread, but it really helped even out the flavors on the plate. I can’t wait to make this again!
Irish Soda Bread
Barefoot Contessa at Home
Serves: about 8 slices
Ingredients:
4 cups all-purpose flour, plus extra for currants
4 Tbsp sugar
1 tsp baking soda
1 1/2 tsp kosher salt
4 Tbsp (1/2 stick) cold unsalted butter, cut into 1/2-inch dice
1 3/4 cups cold buttermilk, shaken
1 extra-large egg, lightly beaten
1 tsp grated orange zest
1 cup dried currants
1. Preheat oven to 375-degrees. Line a sheet pan with parchment paper.
2. Combine flour, sugar, baking soda, and salt in the bowl of an electric mixer fitted with the paddle attachment. Add the butter on low speed until the butter is mixed into the flour.
3. With a fork, lightly beat the buttermilk, egg and orange zest together in a measuring cup. With the mixer on low speed, slowly add the buttermilk mixture to the flour mixture. Combine the currants with 1 Tbsp of flour and mix into the dough. It will be very wet.
4. Dump the dough onto a well-floured board and knead it a few times into a round loaf. Place the loaf on the prepared sheet pan and lightly cut an "X" into the top of the bread with a serrated knife. Bake for 45 to 55 minutes, or until a cake tester comes out clean. When you tap the loaf, it will have a hallow sound.
5. Cool on a baking rack. Serve warm or at room temperature.
Friday, March 19, 2010
Awesome St. Patty's Day Cupcakes!
First thing about these cupcakes (which I'm sure you could guess with them being for St. Patty's Day) is that there's booze in them. Actually there are three different kinds of booze: Guinness, whiskey and Bailey's Irish Cream... in the cake mix, filling and the frosting. Basically I read the recipe (and saw some pics) and knew nothing else could come near to beating it on the awesomeness scale. I came across it on the Serious Eats website last weekend and the pictures were enough to initiate droolage.
Back in college some friend purchased a keg of Guinness for their St. Patrick's Day party. I absolutely abhorred the taste! Needless to say multiple people brought their own beverages. My taste in beer has matured since then... but I'm still not quite up to the Guinness level. Luckily the Guinness in this recipe is cooked down a little then baked in the cupcake batter. I wasn't worried about the flavor because I knew the chocolate in there would enhance the deliciousness. The sour cream helps create a more dense cake. These would even be good if you didn't use the filling.... but they wouldn't be AS awesome :-)
The recipe is surprisingly straightforward, but it takes a good chunk of time to complete the different steps. Once the cupcakes are baked and fully cooled (important to keep the filling from making a big ol' mess) you carve out a circle in the center, going about 2/3rds of the way down. I had experience with this technique from some jam-filled cupcakes I had made last summer. You have to be careful not to cut all the way through or there will be major chocolate spillage when you remove the cupcake liner.
I added extra Bailey's Irish Cream to the frosting because: a. it's absolutely delicious and b... well, it was St. Patty's Day! The flavor of the alcohol is so creamy it just adds that extra oomph to the yummy cupcakes.
The most important thing for me was that these cupcakes were FUN. I really enjoyed the process of making these chocolaty treats. I had initially found another chocolate and Guinness cupcake recipe, but it was too simple. I had the day off and I wanted a challenge! I constantly tortured my family and friends by sending them photo updates as I baked away.
If you want delicious cupcakes for a special event, this is a great recipe to use! You can play around with the different ingredients to enhance certain flavors. Yum!
Chocolate Stout Cupcakes with Irish Whiskey Filling
Makes about 20 cupcakes
Adapted from Smitten Kitchen
For the cupcakes:
1 cup stout (Guinness was perfect)
1 cup (2 sticks) unsalted butter
3/4 cup unsweetened cocoa powder
2 cups flour
2 cups sugar
1 1/2 tsp baking soda
3/4 tsp salt
2 large eggs
2/3 cup sour cream (full fat is best)
For the filling:
8 oz. bittersweet chocolate (I used Ghiradelli.. yum!)
1/3 cup heavy cream
1/3 cup Bailey's Irish Cream (the original recipe called for 2/3 cup heavy cream and no Bailey's, but the baker from Serious Eats loved the flavor with the alcohol)
2 Tbsp butter, room temp.
1 to 2 tsp Irish whiskey (I only had the really cheap stuff, but use the good stuff if you have it. I'm pretty sure you'll taste the difference)
For the frosting:
3 to 4 cups confectioners sugar
1 stick (1/2 cup) unsalted butter, at room temp
3 to 4 Tbsp Bailey's Irish Cream (I eyeballed it... probably used around 6... oh it was tasty)
1. Prep: Pre-heat oven to 350-degrees. Line cupcake cups with liners (I only needed 20)
2. Bring 1 cup stout and 1 cup butter to simmer in heavy large saucepan over medium heat.
3. Add cocoa powder and whisk until mixture is smooth. Remove from heat.
4. In a separate large bowl, whisk flour, sugar, baking soda, and 3/4 tsp salt.
5. In another large bowl, using an electric mixer (I just used my standing mixer), beat eggs and sour cream to blend. Add stout-chocolate mixture and beat until just combined.
6. Add the dry mixture and beat briefly on slow speed. Using a spatula, fold batter until completely combined.
7. Divide batter among cupcake liners, filling them 2/3 to 3/4 of the way. Bake until toothpick inserted into center comes out clean 17 - 20 minutes (It took the full 20 for me). Place cupcakes on a rack until completely cool.
8. While the cupcakes cool, make the filling. Chop the chocolate into coarse, but roughly even pieces (I used bittersweet chips), and transfer to a heatproof bowl.
9. Heat the cream until it is simmering (not boiling) and pour it over the chocolate. Let it sit for a minute, then stir smooth (may need an extra 20 seconds in the microwave). Add the butter, Irish Cream and whiskey and stir until combined.
10. Make space for filling; the original recipe calls for using an apple corer, but using a small paring knife works fine (I gently work the knife around in a circle then pull the piece out. The cupcakes are soft enough that it comes out fairly easy. Just be careful not to cut too far down or you'll be wearing your chocolate filling).
11. Fill the cupcakes. If it's thick you can pipe it, but spooning it in should be easy.
12. Make the frosting: In an electric mixer, mix the butter on medium speed until light and fluffy. Slowly add the confectioners sugar until it looks thick enough to spread. Then add the Irish Cream (come on, you can eyeball it). You can tweak the consistency by adding more sugar if needed. At this point I added a few drops of green food coloring.
13. Frost your cupcakes. (You can pipe it to look really pretty. My piping bag split a few weeks ago and a zippie bag wouldn't work, so I used my little spatula to smear it on) Enjoy!!
Sunday, March 14, 2010
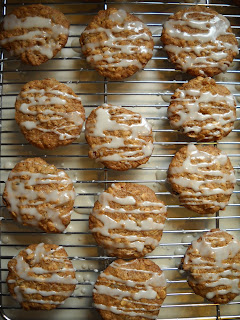
Iced Oatmeal Applesauce Cookies
This is part two of the care package for my sister. These cookies sound like they would be more complicated, but actually, the chocolate chip cookies required more concentration (and it was worth it!). They're super quick to whip together. The applesauce keeps the cookies nice and moist. Yum!
Iced Oatmeal Applesauce Cookies
From Martha Stewart's Cookies book
Makes about 2 1/2 dozen
For the Cookies:
4 Tbsp unsalted butter, melted
1 cup packed light brown sugar
1/2 cup granulated sugar
1 large egg
1/2 cup chunky-style applesauce
1 1/2 cups old-fashioned rolled oats
1 1/4 cups all-purpose flour
1/2 tsp baking soda
1/4 tsp baking powder
1/4 tsp coarse salt
1 cup golden raisins
For the Icing:
1 3/4 cups confectioners' sugar
3 Tbsp pure maple syrup
3 Tbsp water
1. Preheat oven to 350-degrees. Make cookies: Put butter and sugars in the bowl of an electric mixer fitted with the paddle attachment. Mix on low speed until combined. Add egg and applesauce, mix until well blended, 2 to 3 minutes.
2. Mix in oats, flour, baking soda baking powder, and salt. Mix in raisins.
3. Using a 1 1/2-inch ice cream scoop, drop dough onto baking sheets lined with parchment paper, spacing 2-inches apart.
4. Bake cookies until golden and just set, 13 to 15 minutes, rotating halfway through. Let cool on sheets 5 minutes. Transfer cookies to a wire rack set over parchment paper; let cool completely.
5. Make icing: Whisk confectioners' sugar, maple syrup, and water until smooth. Drizzle over cookies; let set.
Cookies can be stored in single layers in airtight containers at room temperature up to 3 days. Enjoy!
Thursday, March 11, 2010
What Makes a Dreary Day Cheerful? Cookies!!
I was talking to my sister the other night and she was explaining all the different papers she has to write and the french exam she has to prep for by next week. Ah yes... finals. Thank goodness those days are over! But I'm still a big sister and when my sister is stressed, I get that old feeling of school stress too. I decided she needed a little care package; something that MUST contain sugary goodness and love. I picked up some cute post-it notes at Borders that have little cartoon foods on them... I couldn't say no to those! I also grabbed a fun pen with little owl graphics on it. I purchased a bag of Easter chocolates at the grocery store (no care package is complete without chocolate!)
Now on to the cookies. I wanted to make something she'd like (pretty much any cookie) and have it be a fun recipe for me to tackle. The first cookies I decided on are the "Perfect Chocolate Chip Cookies". Yet another recipe from our friends at America's Test Kitchen. The second was a recipe out of my Martha Steward Cookies book, but I'll get to those another time. Let's focus on one of the happiest things in the world: Chocolate (Julia Child would probably say butter... and that comes in at a close second here).
Like all of their recipes, the team at America's Test Kitchen go through every step of making these cookies, ensuring that they get the best results possible. I had viewed the episode where they bake these chocolate chip cookies and was intrigued. The thing I found most interesting was that they melted and browned the butter before using it. Why?! Well, I found out. You take all, but 4 Tbsps of the butter and let it melt in a saucepan, constantly swirling. Then it slowly starts to brown. The recipe says to wait until it's dark brown and has a "nutty aroma". Nutty? Ok, I kept swirling and smelling.... and then it happened. No joke, it smelled nutty! Like almond roca! Like you want to eat a spoonful of pure butter! You then transfer it to a bowl and stir in the remaining butter until melted. It will get super bubbly and foam up, then mellow out as it finishes melting.
Now on to the chocolate. I've always used Nestle's chocolate for baking. It's the most affordable and I know it works. Not now. My mom had made chocolate chocolate-chip cookies a few weeks back using Ghiradelli chocolate morsels... and they were delicious! The chocolate took the cookies up a whole extra notch. The grocery store had a special, so I bought two bags of the Ghiradelli semisweet morsels. This was a fabulous decision because during my first attempt of this recipe I completely overlooked the sentence where I add the eggs. How? No idea. I'm sure we've all done it once or twice. I got to the point where I was trying to roll out the balls of dough and they wouldn't stick together! Oh well, the second time around everything went much more smoothly.
How did my cookies turn out? Perfect!! They were melt in your mouth chocolate chip cookies! The edges have a great crunch, yet the centers are super chewy. I was lucky enough to try one when the chocolate was still slightly warm.... Ooooh yummy! The cookies had a nice depth of flavor due to browning the butter. I'm sticking with this recipe for good. You can also find it on their site at America's Test Kitchen.
Perfect Chocolate Chip Cookies
Makes 16 cookies (they're pretty big)
1 3/4 cups unbleached all-purpose flour
1/2 tsp baking soda
14 Tbsp unsalted butter
1/2 cup granulated sugar
3/4 cups packed dark brown sugar
1 tsp table salt
2 tsp vanilla extract
1 large egg
1 large egg yolk
1 1/4 cups semisweet chocolate chips or chunks
3/4 cup chopped pecan or walnuts (optional)
1. Adjust oven rack to middle position and heat oven to 375 degrees. Line 2 large (18- by 12-inch) baking sheets with parchment paper. Whisk flour and baking soda together in medium bowl; set aside.
2. Heat 10 Tbsp butter in a 10-inch skillet over medium-high heat until melted, about 2 minutes. Continue cooking, swirling pan constantly until butter is dark golden brown and has nutty aroma, 1 to 3 minutes. Remove skillet from heat and, using heatproof spatula, transfer browned butter to large heatproof bowl.
3. Stir remaining 4 Tbsp butter into hot butter until completely melted.
4. Add both sugars, salt, and vanilla to bowl with butter and whisk until fully incorporated.
5. Add egg and yolk and whisk until mixture is smooth with no sugar lumps remaining, about 30 seconds. Let mixture stand 3 minutes, then whisk for 30 seconds. Repeat process of resting and whisking 2 more times until mixture is thick, smooth, and shiny.
6. Using rubber spatula or wooden spoon, stir in flour mixture until just combined, about 1 minute (The mixture should start off feeling super silky- shown below, then thicken as you add more flour).
7. Stir in chocolate chips and nuts (if using), giving dough final stir to ensure no flour pockets remain.
8. Divide dough into 16 portions, each about 3 Tbsp (or use #24 cookie scoop). Arrange 2 inches apart on prepared baking sheets, 8 dough balls per sheet. Smaller baking sheets can be used, but will require 3 batches (which I did because of my teeny-tiny oven).
9. Bake cookies 1 tray at a time until cookies are golden brown and still puffy, and edges have begun to set, but centers are still soft, 10 to 14 minutes, rotating baking sheet halfway through baking (I baked 5 minutes, rotated the sheet, then baked 6 minutes more). Transfer baking sheet to wire rack; cool cookies completely before serving. Enjoy!
Subscribe to:
Posts (Atom)