Saturday, November 27, 2010

Quick Fix for Thanksgiving Leftovers


This year my family cooked a 20 lb. turkey for Thanksgiving. In previous years we would purchase a smaller bird and end up with leftover meat for only one extra meal. This year we decided to get a larger bird, thus ensuring more leftovers! This turkey was a beauty! But I'm not going to lie, my arms are a bit sore from lifting it out of the oven every half hour for basting. My husband and I split the leftover meat with my family and came home with a hefty Tupperware container full of juicy, flavorful turkey. Sweet!

I found this recipe for Turkey Pot Pie and it was an instant must-have. I had all of the ingredients on hand, saving me an excursion into the evening crowds at the grocery store. I didn't have buttermilk on hand, but a friend gave me a kitchen tip: add a splash of vinegar to a cup of milk and let it stand for a bit. The milk will sour, thus ending becoming buttermilk. This meal was quick to fix and turned out so much better than I had anticipated! The biscuits were incredibly moist and buttery and paired perfectly with the creamy veggies and turkey. If you don't have turkey on hand, a few cooked chicken breasts do the job.


Turkey Pot Pie
Recipe from Ziploc.com


Serves: 4

Filling Ingredients:
3 Tablespoons butter
3 Tablespoons flour
1/2 medium onion, chopped
1 celery stock, sliced
1 1/2 cups chicken broth
1 1/2 cups leftover mixed vegetables
2 cups cooked turkey, cubed
1 teaspoon fresh thyme
Salt and pepper to taste

Biscuit Ingredients:
2 cups flour
1 Tablespoon baking powder
1/2 teaspoon baking soda
3/4 teaspoon salt
6 Tablespoons cold unsalted butter, cut into small pieces
1/2-2/3 cup buttermilk
2 Tablespoons fresh sage, chopped

Preparation:
Preheat oven to 400 degrees.
For filling: Melt butter in a small saucepan over low heat. Add onion and celery and cook about 5 minutes, until tender. Stir in flour. Slowly add chicken broth. Increase heat to medium and stir until thickened, about 5 minutes. Reduce heat and add turkey and mixed vegetables. Stir in thyme and season to taste with salt and pepper.


Pour into a 2 qt. casserole dish (a 1.5 qt. worked for me).


For biscuit topping: In a food processor combine flour, baking soda, baking powder and salt. Add butter and pulse until coarse crumbs form. Add sage and pulse a couple more times.


Gradually add buttermilk through the feed tube and process until the dough just sticks together.


Turn dough out onto a floured board and knead a few times. Pat dough into a circle about 3/4-inch thick. Cut dough into 4 or 5 circles with a circle cutter or glass. Place circles on top of filling in casserole.


Bake pot pie at 400-degrees for 20-25 minutes or until golden brown.


Friday, November 19, 2010

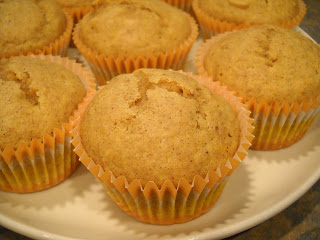
Pumpkin-Orange Muffins


On a typical fall day in the Pacific Northwest, nothing sounds more appealing than being inside, curled up on the sofa with a good book. I was visiting my parents in Portland for a few days and stopped at Powell's the first morning, thus ensuring I was well stocked with reading material. With my new book in hand, the cat comatose in front of the fireplace and the heavy raindrops cascading down the side of the house; it was the setting I always yearn for when the weather turns nasty. These wet fall days call for homemade baked goods. Pumpkin-Orange Muffins are a cinch to whip up and call for ingredients you will likely have on hand this time of the year. They are incredibly moist and are the perfect afternoon snack on a rainy day.


Pumpkin-Orange Muffins
From the American Institute for Cancer Research
Makes 9
Canola oil spray
1 egg
1/2 cup skim milk
1/2 cup canned pumpkin
1/4 cup canola oil
1 tsp. grated orange zest
1.5 cups unbleached flour
1/2 cup sugar
1 tsp. baking powder
1 tsp. cinnamon
3/4 tsp. nutmeg
1/4 tsp. salt

1. Preheat oven to 375-degrees. Spray muffin tin lightly with oil.

2. In a medium bowl, beat egg, milk, pumpkin, oil, and grated orange zest, mixing well.

3. In a separate bowl, combine the dry ingredients. Mix dry ingredients into pumpkin mixture.


4. Spoon batter into a greased muffin tin, filling each cup 1/2 to 2/3 full. Bake until a toothpick inserted in the middle of a muffin comes out clean, about 20 to 25 minutes.


5. Remove from oven and set on a wire rack to cool, about 5 to 10 minutes. Remove muffins and allow to cool completely on rack. Serve immediately or store in a plastic bag or other sealed container but do not refrigerate (If making more than one batch, extras can be frozen.)

Tuesday, November 16, 2010

Season of mists and mellow fruitfulness

"Season of mists and mellow fruitfulness,
close bosom-friend of the maturing sun;
Conspiring with him how to load and bless
with fruit the vines that round the thatch-eves run;
To bend with apples the moss'd cottage-trees,
and fill all fruit with ripeness to the core;
To swell the gourd, and plump the hazel shells
with a sweet kernel; to set budding more,
And still more, later flowers for the bees,
Until they think warm days will never cease,
for summer has o'er-brimm'd their clammy cells."

-"To Autumn", John Keats


Fall has become my favorite season of the year. The excitement of approaching holidays, the vibrant oranges and ambers of leaves still clinging to their branches, breathing in the crisp morning air that holds a hint of winter, and hearty foods that evoke memories of family dinners past.


In many cultures, families have solid traditions of eating meals together at the dinner table. This is the one time of the day where everyone is together, enjoying their meal and sharing various events from their day. Sadly, the fast pace of today's American society encourages quick meals on the go. Many families are too busy to sit down and spend an hour together enjoying a homemade meal. I was very blessed to grow up in a family where we had a sit-down meal together every night. I remember sitting on a barstool at the kitchen counter with my dad, munching on chips and salsa (some things never change!) while my mom prepared dinner. Once dinner was ready, my family would sit down around the table and say grace. One at a time, we would each state one thing that we were thankful for; be it a good day at school, for the wonderful meal before us or for all of the cute kitties in the world. The daily ritual of coming together over a meal strengthened our family bond and established cooking as something to share with loved ones.


Honey-Mustard Chicken with Apples is a wonderful dish to prepare on a week-night. Everything is cooked in one pot, making clean-up a much easier task. The apples and onions add a vibrant bite of flavor to the chicken. The chicken simmers in the broth-honey mustard mixture and stays incredibly moist throughout cooking. This would pair nicely with a side of mashed potatoes. Next time I will double the amount of apples from two to four; they are truly amazing with the chicken. Always use caution when handling the pot after removing it from the oven; those handles are hot!

Honey-Mustard Chicken and Apples
Food Network Magazine, October 2010
Active: 30 min Total: 40 min. Serves: 4


8 skin-on, bone-in chicken thighs (2 to 2.5 lbs)
Salt and freshly ground pepper
2 tablespoons extra-virgin olive oil
1 large onion, cut into large chunks
2 cooking apples (such as Cortland), cut into chunks (I recommend 4 apples)
1 cup low-sodium chicken broth
2 to 3 tablespoons honey mustard
1.5 teaspoons unsalted butter, softened
1 to 2 tablespoons roughly chopped fresh parsley


1. Preheat oven to 450-degrees. Season the chicken with salt and pepper. Heat the olive oil in a large ovenproof skillet over medium-high heat. Working in batches if necessary, add the chicken, skin side down, and cook until golden, about 6 minutes. Flip and cook 2 to 3 more minutes, then transfer to a plate. Pour off all but 2 tablespoons of the drippings.


2. Add the onion and apples to the skillet and season with salt and pepper. Cook until slightly softened, about 4 minutes. Mix the broth with the mustard, then add to the skillet and bring to a boil. Arrange the chicken, skin-side up, in the skillet. Transfer to the oven and roast until the chicken is cooked through, 15 to 20 minutes.


3. Mix the butter and flour to form a paste. Use a slotted spoon to transfer the chicken, apples and onion to plates. Bring the pan juices to a simmer, whisk in about half of the butter-flour mixture and boil to thicken, 2 minutes. Continue to cook, adding more of the butter-flour mixture as needed to make a slightly thick gravy. Season with salt and pepper. Pour over the chicken and sprinkle with parsley. Enjoy!


Wednesday, August 25, 2010

Raspberry Tiramisu


The last few weeks have been so relaxing! No more wedding plans to finalize, no more waking up in the middle of the night remembering something I have to do... it's peaceful! Work is usually fairly quiet during the summer months, so instead of my desk being a mountain of to-do lists and pages torn out of wedding magazines, I have a few novels, cookbooks and half-finished crosswords scattered about!

The wedding was magical. Our pastor did an amazing job for the ceremony, and despite being nervous about standing in front of everyone, I actually paid attention to what he said! The reception was a total blast. The hall was decorated beautifully and the food was to die for! We had a buffet featuring beef and salmon. Both were delicious. If I hadn't been afraid of bursting out of my dress (think Hulk), I would have eaten more... a lot more! The Edgefield baker did a wonderful job on our cake. It was a white cake with raspberry filling and a white chocolate cream cheese frosting. There were a number of other desserts set out, which sadly I didn't get to sample. Does anyone remember what any of these were?


Dale and I drove up to Portland on our days off last week to celebrate my birthday with my family. Instead of doing gifts, I requested that we make my favorite dish for dinner:
Sun dried tomato pesto-stuffed pork tenderloin, with sides of garlic mashed potatoes and steamed fresh green beans (I'm risking droolage just remembering it). For dessert I wanted to make a raspberry tiramisu. My "Giada's Family Dinners" cookbook has this recipe... and a lovely photo that immediately won me over.


My sister Tiffany was happy to make this dish with me. It is composed of layer upon layer of ladyfingers, raspberry jam with orange liqeur, a mascarpone cream, and fresh raspberries. The longer this dish sits, the better it tastes! It is truly beautiful once completed. This would be a stunning dessert to serve at a dinner party! It can be made the night before or the morning of to allow the flavors to deepen. And any remaining ladyfingers are perfect with coffee or tea.


Raspberry Tiramisu
Giada di Laurentiis, "Giada's Family Dinners"
8 to 10 servings

1 cup seedless raspberry jam
6 tbsp. Grand Marnier (or another good quality orange liqeur)
1 pound mascarpone cheese, at room temp.
1 cup heavy cream
1/4 cup granulated sugar
1 tsp. pure vanilla extract
48 soft ladyfingers (2 3-oz packages) or 40 dry Italian ladyfingers (2 packets)
3 baskets fresh raspberries (about 4 cups total, but the more the merrier!)
Confectioners sugar, for dusting

Stir together the jam and 4 tablespoons of the Grand Marnier in a small bowl to blend.


Stir together the mascarpone and remaining 2 tablespoons of Grand Marnier in a large bowl to blend. Using an electric mixer, beat the cream, granulated sugar, and vanilla in another large bowl until soft peaks form. Using a large rubber spatula, stir a fouth of the whipped cream into the mascarpone mixture to lighten. Fold the remaining whipped cream into the mascarpone mixture.


Line the bottom of a 13 x 9 x 2-inch glass baking dish (or trifle bowl) with a third of the ladyfingers. Spread a third of the jam mixture over the ladyfingers. Spread a third of the mascarpone mixture over the jam mixture, then cover with a third of the fresh raspberries. Repeat layering with the remaining ladyfingers, jam mixture, mascarpone mixture, and raspberries. Cover and refrigerate at least 3 hours or overnight.


Dust the confectioners sugar over the top right before serving. Enjoy!

Thursday, July 1, 2010

The Perfect Summer Soup


I get very antsy when I go for more than approximately four days without cooking. I miss the excitement of trying something new, whether it be using a new food, trying a new technique, or just exploring a new recipe. So last week as I was planning what recipes I would make for dinner, I ran across the recipe for Zucchini Vichyssoise in Ina Garten's "Barefoot in Paris" cookbook that I have been borrowing from my mom. Vichyssoise is a cold potato leek soup. I have read multiple variations of this recipe over the years, but somehow it always sounded a little odd. This past year I've learned that despite their rather intimidating appearance, leeks are actually really tasty! Zucchini is in season right now and sounded like a great addition to this recipe!


On of my books on kitchen tips explains an easy method for cleaning leeks. Slice off the thick, dark green leaves. Then slit the leek lengthwise, almost to the root end. Hold the leek under running water, fanning out the leaves to wash them thoroughly. Having the leaves still intact makes it easier to chop. A few of my Rachael Ray recipes say to chop up the leek then place in a bowl of water, swish, then let stand for a minute. The dirt and sand will sink to the bottom and the leaves will float. I personally prefer the first method.


Zucchini Vichyssoise is really good both warm and chilled. My first bowl was right after it finished cooking. It tastes quite a bit like potato soup, but the zucchini adds a nice touch. I took some to work and had it chilled for lunch. I let it sit at room temperature for ten minutes to take it from really cold to cool. Chilled vichyssoise is a great option for hot summer days. It does have to cook on the stovetop for a while, so if it's going to be a hot day, try to make it in the morning or the evening before. And for a nice touch, add a few thin strips of zucchini and chives to your bowl of soup. Then give it a quick drizzle of good quality olive oil - not cheap olive oil, you will taste the difference.


Zucchini Vichyssoise
From Ina Garten's book "Barefoot in Paris"
Serves 5 to 6

1 tablespoon unsalted butter
1 tablespoon good olive oil
5 cups chopped leeks, white and light green parts (4 to 8 leeks)
3 cups chopped zucchini (2 zucchinis)
1 1/2 quarts chicken broth
1 tsp kosher salt
1/2 tsp freshly ground black pepper
2 tablespoons heavy cream
fresh chives or julienned zucchini, for garnish

Heat the butter and oil in a large stockpot, add the leeks, and saute over medium-low heat for 5 minutes. Add the potatoes, zucchini, chicken stock, salt, and pepper; bring to a boil; then lower the heat and simmer for 30 minutes.


Cool for a few minutes and then process through a food mill fitted with the medium disc (I used my immersion blender, mixing in batches in a regular blender would work too). Add the cream and season to taste. Serve either cold or hot, garnished with chopped chives and/or zucchini.

Wednesday, June 30, 2010

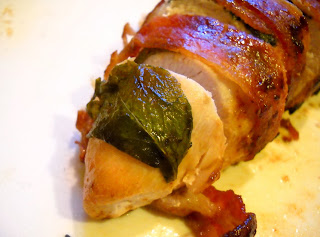
Pancetta Wrapped Chicken with Sage


Wow, June has flown by! Needless to say, with the wedding a mere 32 days away, things have been a bit busy. I have made a few great dishes that I really wanted to put on here, but it’s taken a little while to find both the time and the right environment to write in. I am quite excited for the wedding, but will feel a lot better once all of the final details are figured out. Mostly that is finding someone to be in charge of the music and announcing the different dances, cake cutting, etc. I have been getting a lot of help from family members, which is great!


A coworker came across this recipe for Chicken with Pancetta and Sage in a House Beautiful magazine from last year. The article included pictures, displaying how to correctly wrap the chicken and sage leaves in pancetta. Over the past few months my scrawny sage plant has completely taken off and is now flourishing! (See photo above). I thought of this recipe and had all of the needed ingredients on hand, except for pancetta. The article mentions that thinly sliced bacon can be used instead. Next time I would like to use pancetta because I love it’s taste and crisp texture once cooked. Make sure the breasts are all about the same size so they take the same amount of time to cook. Also, when reading the recipe I had forgotten that the wrapped chicken is supposed to chill in the fridge overnight. I popped it in the freezer for half an hour and it worked fine.


The final result is delicious! The sage offers a slight earthy freshness and the pancetta (or bacon) pairs wonderfully with the chicken. By being completely surrounded by pancetta, the chicken breast stays quite tender. I served it with wild rice. Mushroom risotto and a vegetable such as asparagus would go well with this dish.

Chicken with Pancetta and Sage
Marco Canora
Serves 4

About ½ pound pancetta, thinly sliced and uncoiled (or around 12 slices of bacon)
24 small sage leaves
Kosher salt and freshly ground black pepper
4 medium boneless, skinless chicken breasts (about 7 oz. each)
About 2 tablespoons of extra-virgin olive oil

1. Depending on the size of the pancetta, lay three or four slices on a clean work surface so they overlap and form a wide enough sheet to completely enclose a chicken breast. Arrange three sage leaves across the sheet of pancetta.


2. Salt and pepper one of the breasts. Fold the tender in (the small loose flap of meat on the underside). Place the breast on the sage leaves and arrange three more sage leaves on top.


3. Fold the pancetta around the breast, and then wrap the breast in plastic, twisting the ends to form a tight, compact log. Repeat with the remaining chicken breasts, and then chill overnight.


4. About 30 minutes before you wish to eat, remove the chicken from the fridge. Heat a skillet (large enough for all 4 breasts) over high heat. When the pan is hot, add a skim of oil (a few tablespoons). Take the chicken out of the plastic. Place breasts in pan so the seam (the loose edge of the folded pancetta) is on the bottom and cooks first.


5. Allow the pan to heat back up. When it begins to sizzle, in about two minutes, lower the heat to medium. Allow the pancetta to brown, about two minutes more, and then turn each breast a quarter turn. Gradually brown the meat on all sides (turn each breast at least four times), about 20 minutes in all. Remove the pan from the heat. Let the chicken sit in the pan off the stove for three minutes, then flip each breast and let it sit for three minutes more. Slice into nice, thick disks and serve.

Sunday, May 23, 2010

Little Bites of Herby Goodness


Dale and I celebrated Mother's Day at his mom's house a few weeks back. For an appetizer, his step-dad made crostini topped with a ricotta spread and a dollop of a ricotta-pea mixture. It was so good! When my sister and I were in Portland a few days later to celebrate with our parents, I wanted to do a similar appetizer. I found a recipe in my "Giada's Family Dinners" cookbook for Herb-Coated Goat Cheese. This sounded like the perfect spring-time treat. Oh, and I forgot to mention, I adore goat cheese! Two summers ago my mom and I would frequently go to the farmers market on the PSU campus. I loved the downtown atmosphere and the food vendors were great! One in particular sold the most scrumptious goat cheese! My mom would give in every once in a while and we would enjoy goat cheese on crackers as an appetizer before dinner. Mmmm... So yes, the goat cheese won me over on this recipe.

Make sure you use fresh herbs for this recipe. You will definitely taste the difference. The cheese balls can be made one day ahead of time and stored in the fridge. To serve, just place a cheese ball on a crostini and spread it with a knife. The goat cheese has such a warm, creamy flavor that goes great with the freshness of the herbs. This is a perfect recipe if you have company over for dinner. It would pair really well with a white wine.


Herb-Coated Goat Cheese
Makes around 35
Giada de Laurentiis

35 (1/2-inch thick) slices of baguette
3 Tbsp. olive oil
3 Tbsp. finely chopped fresh flat-leaf parsley
2 1/2 tsp. finely chopped fresh thyme leaves
2 tsp. finely chopped fresh rosemary
1 tsp. chopped lemon zest
1 tsp. coarsely cracked black pepper
1/4 tsp. salt
1 (11-oz.) log soft fresh goat cheese
1 1/2 Tbsp. extra virgin olive oil
Fresh herb sprigs, for garnish

Preheat the oven to 375-degrees F. Arrange the bread slices on two heavy large baking sheets. Brush the bread slices with olive oil and bake until the crostini are pale golden and crisp, about 15 minutes (don't cook for much longer or they'll be super crunchy).

Meanwhile, stir the herbs, lemon zest, pepper, and salt together in a medium bowl to blend. Form the goat cheese into 1-inch-diameter balls, using about 2 teaspoons of cheese for each. Roll the cheese balls in the herb mixture to coat completely. Arrange the cheese balls on a platter. Drizzle the extra-virgin olive oil over and around the cheese balls. Serve with the crostini.

Note: Can be prepared 1 day ahead. Store crostini in an airtight container at room temp. Cover and refrigerate the cheese balls.

To view my blog's website: Mangiamo-Alli

Sunday, May 9, 2010

Show Your Salad a Little Love


Over the past year I have been subscribing to fewer and fewer food magazines. I end up with piles stacking up on dining room chairs or next to my desk in the bedroom. Every once in a while I go through and cut out the recipes I want to keep and recycle the rest. Right now I am receiving Cooks Illustrated and Cooks Country (my fave!) and get most of the rest off the internet. One extra treat is the little Relish magazine that comes in the newspaper on the first Monday of each month. While flipping through the April issue, I stopped on an article called "The Art of Salad". Three salad dressing recipes accompany it: Homemade Ranch, Sun-Dried Tomato, and Lime Honey Mustard. The last two sounded intriguing and have healthy ingredients.


I made the Lime Honey Mustard dressing for the first time a few weeks back, then again this morning. I get bored with some of the standard dressings and vinaigrettes, so this one really appealed to me. I have come to love cilantro over the past year; it has an almost citrus taste and just makes you feel like it's summer. When I pick up a bunch of cilantro I always put my face right next ot it and inhale deeply, it smells so good!! Combined with the lime, ginger and mustard, the cilantro adds a great kick of flavor to your dressing. I use green-leaf lettuce and some veggies in my salad. Arugula and spinach would work great too. Usually salads are so ho-hum, but this dressing had me looking forward to my lunch!


Lime Honey Mustard Dressing
Makes about 3/4 cup
Relish Magazine

1/4 cup rice vinegar or white wine vinegar
1 shallot, minced
2 Tbsp. finely chopped cilantro
1 1/2 tsp. Dijon
1 1/2 tsp. honey
Grated rind of 1 lime
1 tsp. fresh lime juice
1/2 tsp. grated peeled fresh ginger
1/2 tsp. salt
1/8 tsp. coarsely ground black pepper
1/4 cup extra-virgin olive oil

Combine all ingredients in a bowl. Whisk well.


Monday, May 3, 2010

Pesto Chicken Grill Packets


As I mentioned in my last post, making pesto in big batches and freezing it is a great way to ensure you have it on hand throughout the year. I had quite a few basil plants last summer and used them all up in September to make my regular pesto. I had one batch left in the freezer (a 1-cup portion) and knew it was perfect for this recipe. I ran across it in my Rachael Ray magazine. It calls for you to cook the packets on an outdoor grill... which I lack. Luckily Rach tells you how to cook it in the oven.

The grill packets include a nice selection of veggies: zucchini, tomatoes and scallions. Because these packets are rolled up tight, the moisture from the chicken is trapped and helps cook the veggies. Dale must have thought I was crazy when I pulled the packets out of the oven and started murmuring, "They're so beautiful! They're perfect!!" I believe I've mentioned before how frustrating cooking chicken can be. Due to health concerns you have to make sure it's cooked enough, which can lead to the outside getting overcooked, especially on the stove top. When I opened the first (and largest) packet I quickly stuck it with my thermometer and it was the perfect temp! Happy Alli! The veggies were perfectly cooked. Dale avoided his zucchini, he just doesn't know that he likes it yet :-) The chicken had just the right amount of moisture and paired with the home-made pesto... oh my mouth is watering just remembering it!


I made Giada de Laurentiis' Basic Risotto. My sister made it a few weeks ago and it was perfect! I had a few other things going on so I wasn't as diligent about stirring and it seemed to change the end result slightly, but it was still yummy. I'm going to have to make my sis my risotto girl. I also sauteed some asparagus. Just chop each asparagus into 3 pieces (approximately 2" long each) and saute in some olive oil, tossing the pan every minute or so. Dale shocked me while we were eating by telling me how much he loves asparagus. It was a revelation a few months ago when I learned that asparagus can taste good when it isn't steamed to death! By cooking it on the stove top it's easier to poke or sample pieces to test the doneness. Finish with a little salt and pepper and you're set!

This chicken recipe is super easy and will be perfect this summer for those of you who have an outdoor grill!


Pesto Chicken Grill Packets
Recipe: Victoria Spencer, Rachael Ray Magazine
4 Servings

Extra-virgin olive oil, for drizzling
4 skinless, boneless chicken breast halves
Salt and pepper
1 cup pesto
2 zucchini, thinly sliced crosswise into circles
4 plum tomatoes, chopped
8 scallions, trimmed (I sliced into pieces about 2-3" long)

1. Preheat grill to medium (or preheat oven to 355-degrees). Cut four 12-inch long sheets of heavy-duty foil. Drizzle 1 Tbsp. olive oil into the center of each sheet.

2. Season the chicken with salt and pepper. Lay 1 piece of chicken in the center of each sheet and spread 1 Tbsp. pesto on top of each piece.


3. Mound a quarter of the zucchini, tomatoes and scallions over each chicken breast. Dollop 3 Tbsp. pesto over each mound. Fold the foil over the chicken and vegetables; pinch the edges to seal (I try to have the seam along the top so the juices can't leak out).

4. Cover and grill the packets over indirect heat for 25 minutes. Remove from the grill and open carefully (the steam is hot!). (If using oven, place packets on a pan and bake for 35 minutes).